ADVERTISEMENT
Make the coconut mixture:
Heat the milk: In a medium saucepan, pour 300ml of milk and place over medium heat. If using 3 tablespoons of sugar (optional), add this to the milk now and stir until dissolved.
Add the coconut: Once the milk is hot, stir in 1 cup of shredded coconut. Continue to cook the mixture over medium heat, stirring constantly to prevent it from sticking to the bottom of the pan.
Cook until thickened: Cook the mixture for about 8-10 minutes, or until it begins to thicken and pull away from the sides of the pan. You will know it is ready when the coconut absorbs most of the milk and the mixture becomes a thick paste.
Cool and shape the coconut mixture:
Cool: Transfer the coconut mixture to a plate, spreading it out slightly to help it cool more quickly. Cover the plate with plastic wrap to keep the mixture moist while it cools. Let sit for 20 to 30 minutes, or until completely cool to the touch.
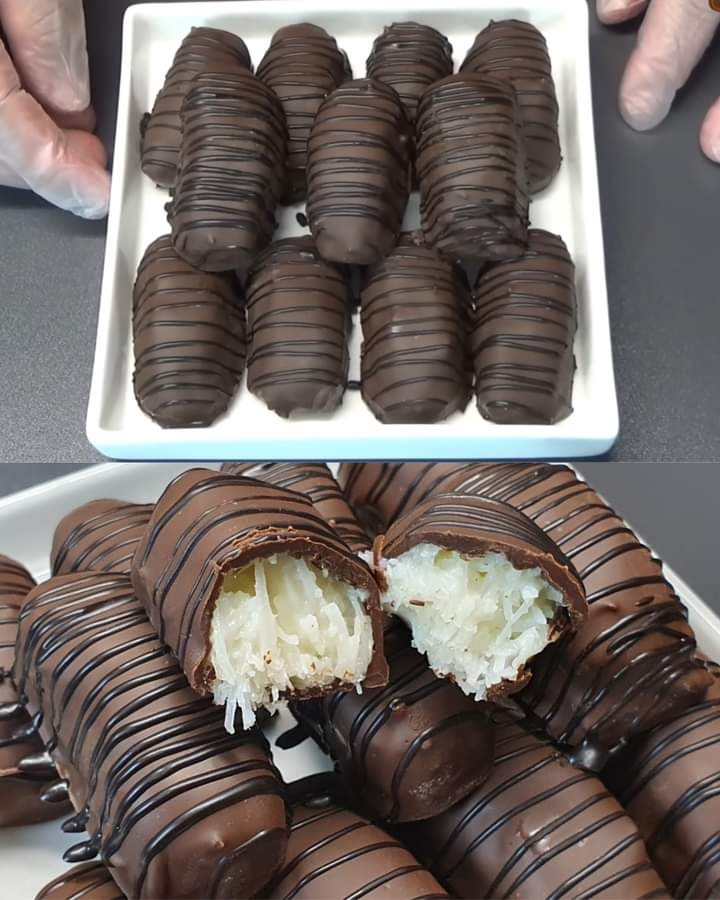
Shape into balls: Once the mixture has cooled, use a 15g scoop (or small spoon) to portion out the mixture. Roll each portion between your hands to form small balls. You should end up with about 20 coconut balls.
Chill to set: Place the shaped coconut balls on a tray or plate and transfer to the refrigerator to chill for at least 1 hour. This will help them firm up and hold their shape when coated in chocolate.
Coat the coconut balls in chocolate:
Melt the chocolate: While the coconut balls are cooling, melt 200g of chocolate in a microwave-safe bowl or over a bain-marie. If necessary, temper the chocolate to ensure a smooth, glossy finish when it hardens.
Dip the coconut balls: Using a fork or dipping tool, carefully dip each cooled coconut ball into the melted chocolate, coating completely. Allow excess chocolate to drip off before placing the coated balls on a sheet of baking paper.
Optional decoration: For a decorative touch, drizzle the coated balls with a little more melted dark chocolate or sprinkle with shredded coconut.
Set up and serve:
Chill again: Place the chocolate-covered coconut balls back in the fridge for about 5 minutes, or until the chocolate has hardened and set.
Serve: Once the chocolate is completely set, your coconut treats are ready to serve! Enjoy them chilled or at room temperature.
Tips and Variations:
Sweetness Adjustment: If you prefer less sweetness, omit the sugar from the coconut mixture. The chocolate coating will still provide plenty of sweetness.
Flavor Variations: You can experiment by adding a pinch of vanilla extract or even a pinch of cinnamon to the coconut mixture for extra flavor.
Chocolate Choice: Dark chocolate offers a more intense flavor that balances the sweetness of the coconut, while milk or white chocolate offers a sweeter, creamier result.
Add Nuts or Fruit: For a little texture, consider adding chopped nuts, like almonds or hazelnuts, or dried fruit, like raisins or cranberries, to the coconut mixture before shaping it into balls.
Make It Vegan: Use a plant-based milk like almond or coconut milk, and choose dairy-free chocolate to make this recipe vegan.
Storage and Serving Suggestions:
Storage: Store these coconut bites in an airtight container in the refrigerator for up to 1 week. You can also freeze them for longer storage, up to 2 months. Just thaw them in the refrigerator before serving.
Serving Ideas: Serve these bites as part of a dessert platter, or pair them with coffee or tea for a simple and elegant treat. They also make great homemade gifts for friends and family!
Enjoy your homemade coconut treats!
This quick and easy coconut treat recipe is a great way to satisfy your sweet tooth with minimal effort. The creamy coconut filling combined with the smooth chocolate coating makes these bites a delicious treat any time of day!
ADVERTISEMENT

